Watching the tank for sixty seconds tells you a lot. Water that rises well after the flush ends, a hiss that will not quit, or a refill that drags: each of these implicates the fill valve. It comes down to an inexpensive part and well under an hour of effort. Broader toilet topics sit on toilet repair. Would you rather skip it? Use the quote form and a plumber gets lined up. Other services we arrange are on the home page.
What does a failing fill valve look like?
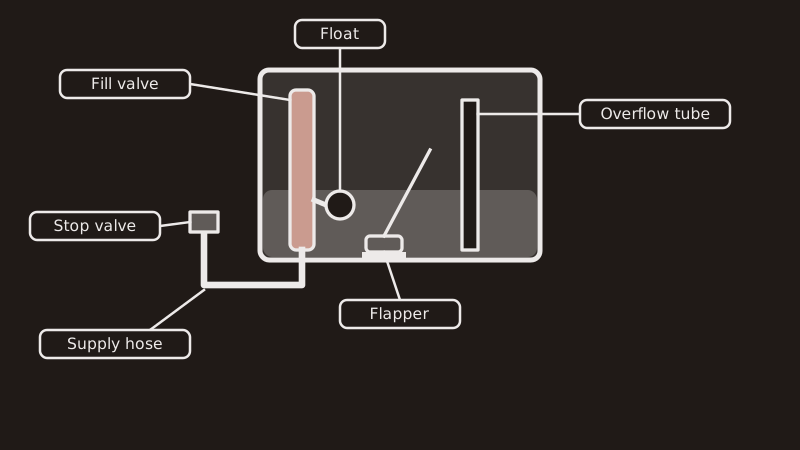
You will find it standing upright inside the tank, often on the left. Each flush opens it, and it closes again when the float reaches a preset height. When it wears out, it may hiss, refill slowly, trickles into the overflow tube nonstop, or makes the toilet refill itself with nobody nearby.
Rule out the flapper first, before you buy. A leaking flapper lets the tank seep down into the bowl, so the valve keeps opening, and the symptoms copy a faulty valve. Add dye to the tank water, replace the lid and give it 20 minutes. Check the bowl afterward. Tinted water points at the flapper; clear water with a tank that keeps running points at the valve.
Water height matters too. A tank that fills right to the top of the standpipe never shuts off. Drop the float a notch and see whether that settles it.
How is a new fill valve installed?
Close the wall stop, flush, and dry out the tank with a sponge. Loosen the supply hose at the tank bottom, unscrew the big locknut and pull the old valve out. Match the new valve's length to the number on its box, hand-tighten the locknut plus roughly a quarter turn, put the hose back and open the stop slowly. Then trim the float until water stops about 1 inch under the standpipe rim.
First-timers may like this sequence:
- Turn the stop clockwise until it halts. If it will not budge, shut the house main and leave it be.
- Flush again and sponge out the remainder.
- Put a small pail below the hose connection and unthread the hose.
- Remove the locknut underneath, and the old valve slides out.
- Insert the new valve with its critical-level mark above the top of the standpipe.
- Go gently on the nut, since tank plastic cracks if forced.
- Snap the narrow refill tube onto the standpipe with its end aimed inward.
- Reconnect, open the stop, and hold a dry tissue against every joint to reveal a weep.
Universal kits cost little and suit most tanks. Look under the tank after ten minutes, and again tomorrow.
What about the flapper and its seat?
The tank is empty anyway, so swap a soft, curled or slimy flapper now. Pull the old one off its pegs, hook on the new one, leave a bit of slack in the chain, and wipe the drain opening's rim. Mineral crust on that rim keeps any flapper from sealing.
Flappers come in different sizes, usually two or three inches, so take the worn one with you and compare it with the packages. Too tight a chain holds the flapper open; too loose a chain can tangle beneath it.
Many tanks sit on a gasket where tank meets bowl. If it fails, water pools on the floor behind the toilet. Repairing that means taking the tank off, a heavier job that suits a plumber better if it would be your first. The flapper repair guide covers the inexpensive part in depth.
Will a running toilet push up my water bill?
Absolutely. Water from a running toilet heads for the drain at all hours, and the meter counts it all. The EPA puts household leak losses above 9,300 gallons per year, and toilets are a common source. How much one running toilet adds to a bill in this part of California is not a figure we could source, so we print none.
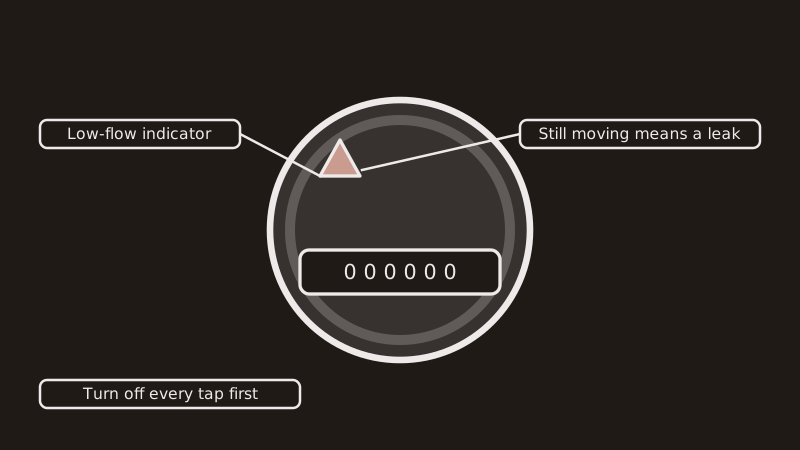
Quiet leaks are why a bill is often the first warning. With all taps closed, check the low-flow indicator on the meter. A moving indicator means a leak somewhere, and the dye test shows if the toilet is responsible.
When the toilet is clean and the bill still rises, look to why water bills run high for the other usual causes. Your supplier, whether San Bernardino Municipal Water, East Valley, the City of Redlands or Yucaipa Valley, can confirm meter-read dates.
What if the hose feeding the toilet bursts?
On a toilet, the part that can actually burst is the supply hose, the braided line running from the wall to the tank. A split sprays water onto the wall or floor. Close the stop at the wall, or the main if that stop fails, then mop up. A replacement hose is cheap and goes on in minutes.
Braided hoses wear out. A swollen braid, a rusty nut or a bead of water clinging to a fitting all mean replace it. Match the old length: a longer hose kinks, and a shorter one strains both ends.
A leaking stop valve, or a failure inside the wall, goes beyond a DIY fix. Close the main and read emergency burst pipe help.
What kinds of trouble call for a plumber?
Step back if the stop will not close or weeps, the bowl rocks, the floor near it is damp, a new fill valve still runs, or the tank is cracked. Seepage at the base can ruin a subfloor. This Old House lists toilet repair at $100-$300, and what you actually pay comes from the written quote.
Corroded stops and anything inside the wall are contractor work. A contractor license is a California requirement at $1,000 in combined labor and materials, and for each permitted job. A fill valve swap falls well under that.
If your real complaint is a weak flush or a clog, head to toilet flush repair. A tank that just will not stop is covered at toilet keeps running.
Common questions
How much time is involved?
Plan on an hour for a first fill valve, plus a store trip if you do not have a kit. A flapper takes about ten minutes. A plumber works faster, but when one arrives depends on the day's calls, and we cannot promise a time.
Which valve should I buy?
A universal valve with adjustable height fits most tanks, and the box lists the depths it covers. Measure from the tank floor up to the standpipe top and compare. One-piece and pressure-assist toilets need special parts, so find the model name stamped inside the tank.
The new valve still runs. What next?
Go back to the flapper, because any leak there reopens the valve. After that, check the water height, the refill tube position and the chain slack. Debris can hold a fresh valve open too, so flush water through it for a moment with the cap off.
Is it okay if no one is home?
Not for a plumber's visit; somebody has to open up, show the toilet and approve the price. A do-it-yourself swap needs no audience, but warn the household that the toilet will be out for an hour, and find the main valve beforehand.