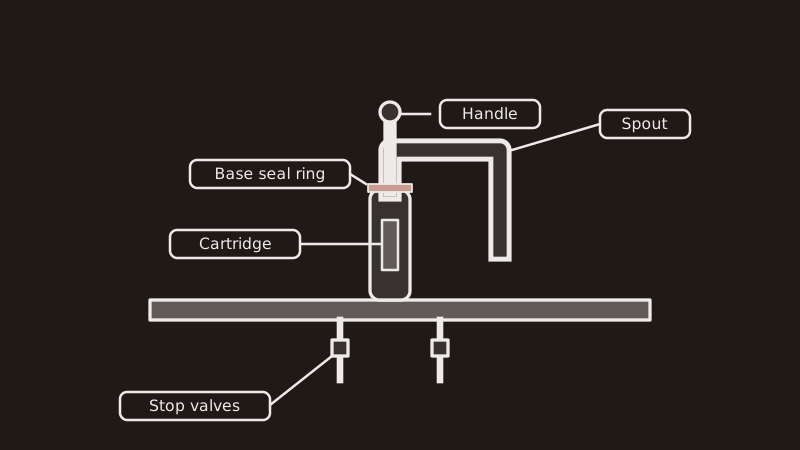
Crouch under the sink first. A quarter turn closes the little stop valve, and then you can lift the handle off and see the guts. A single tired rubber or plastic piece is behind almost every drip, and the replacement is a cheap part. If the same cabinet also hides a jammed disposal, that has its own section further down. When the faucet wins, you can pass it along using the quote form. More of what we arrange sits on the home page.
Which piece of my faucet has gone bad?
The location of the wetness gives it away. Water collecting on the lip of the spout when the handle is closed means a tired seal in the body. Wetness collecting around the foot of the handle suggests a ring seal or a slack packing nut. A damp cabinet floor can come from elsewhere entirely, such as braided supply hoses, the stops or the drain trap.
Four designs cover most faucets, and yours decides the repair:
- Compression: two handles and a rubber washer that presses on a seat. The washer or the seat wears out.
- Cartridge: one or two handles, with a plastic or brass cartridge that pulls straight out.
- Ball: a single handle on a rounded cap, seen on older kitchen faucets, built with springs and seals.
- Ceramic disc: a single handle over a wide cylinder. It rarely leaks, and usually the fix is a new cylinder.
Delta builds cartridge, ball and ceramic versions alike, so the brand on the spout decides nothing. Remove the handle and look inside. Snap a photo at every layer on the way down, since putting things back in order is where people stumble.
Walk me through replacing parts in a sink faucet
Both stops get turned clockwise. Open the faucet to let it empty, pop the decorative cap and remove the screw holding the handle. Draw out the cartridge, or unthread the stem, drop in an identical replacement and reassemble in reverse order. Let the stops open slowly. Block the drain with a cloth first, or a dropped screw is gone for good.
A few habits keep the job smooth:
- Bring the worn part to the shop. Sizes differ by fractions of an inch, and close is not good enough.
- Silicone plumber's grease on fresh O-rings keeps them from tearing as they go on.
- Rocking a stuck cartridge from side to side often frees it. An inexpensive puller outperforms a screwdriver.
- Scrub the valve seat with a rag, since grit beneath new rubber starts the next leak.
- Open the stop a crack, look for moisture, and then turn it the rest of the way.
A swivel spout sits on O-rings wrapped around its body. If it weeps at its foot instead of its tip, suspect those rings and leave the cartridge alone.
How is a dripping bathtub or shower valve repaired?
Same thinking, larger hardware. Close the bathroom's stop or the main supply, remove the handle along with its trim plate. Behind it, set into the wall, is a cartridge or stem. Install the same model. A spout that keeps dribbling once the shower is on usually has a diverter problem, and that part unscrews separately.
Shutting the water off is the hard part. Plenty of older tub valves come without stops, which leaves the main as your only way to stop flow. Locate it before touching a screw. Should the main refuse to turn, quit and book a plumber, because a failed valve behind tile can flood a room.
The tub has its own page, including tile access: fixing a leaky bathtub faucet.
Is the outdoor spigot something I can repair?
A weep at the handle generally means the packing nut is loose. Tighten it by an eighth to a quarter rotation using a wrench. When the spout itself drips, the washer is bad. Close the supply, back the stem out, fit a new washer and put it together. Frost-free models have a long stem with the washer buried deep in the wall.
Take the hose off between watering sessions. A hose left attached keeps water pushing on the spigot and strains the threads. A worn backflow cap on the spout can leak as well. Unscrew it, check the disc and replace the cap if the plastic has cracked.
Leakage in the spot where the pipe goes through the wall is a separate problem, one that may be wetting the cavity behind. Close the supply and have a plumber look.
Is hard water behind the drips in this area?
It speeds them up. Scale roughens the seat and lodges in the cartridge, so washers get chewed and ceramic discs get scratched. Customers of San Bernardino Municipal Water Department can read the 2024 report: hardness averages 242.67 mg/L across a range of 120 to 330, close to 14.2 grains per gallon. The figure shifts with supplier and street, so check your bill.
Redlands, Highland and Yucaipa customers see lower numbers. Redlands reported 148 mg/L for groundwater in its 2026 report, East Valley Water District reported 152 ppm and Yucaipa Valley Water District 133.3 ppm. Even moderate hardness crusts an aerator.
White crust on a spout lifts off after a vinegar-filled bag has been strapped over it for an hour, followed by a scrub. If it keeps coming back, consider installing a water softener.
What does fixing it myself save?
A Bob Vila cost guide shows a kitchen faucet job at $161 to $364, and This Old House lists faucet replacement at $150 to $600. A repair kit costs a small share of either. Wasted water also adds up: Every year a typical household wastes, according to the EPA, more than 9,300 gallons this way. The price any plumber charges is the one in the written quote.
Those numbers are for a whole new faucet, which becomes the answer when the body corrodes, the finish pits or the maker stops selling parts. When a faucet is more than 15 or 20 years old and the repair kit is hard to find, buying new is often the sensible route.
Look at the figures on our faucet installation cost page before you decide. Parts are cheap, yet an hour spent fighting a seized handle can cost more than a visit.
My Waste King garbage disposal is jammed. How can I fix it?
First the wall switch goes off, and the unit is unplugged or its breaker tripped. No hand goes into the disposal. Look at the underside. Many models, Waste King among them, have a hex-shaped socket in the middle. The manual names the Allen key size, often 1/4 inch, and working it back and forth can free the flywheel. Finish with the red reset button on the base, then run cold water to test.
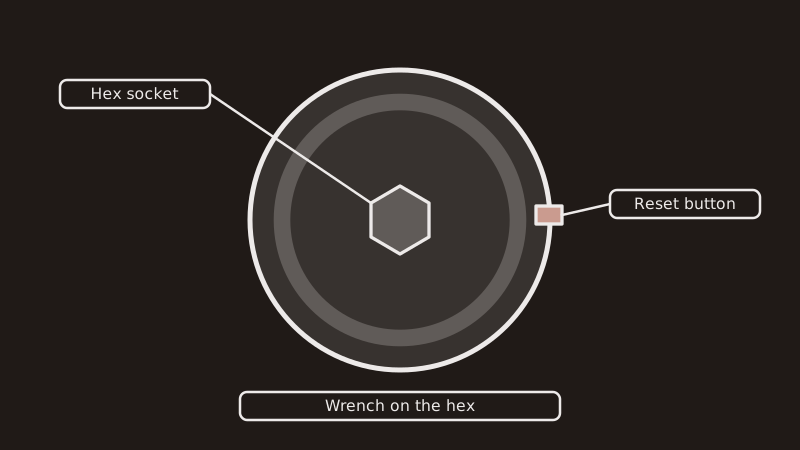
If it hums but does not turn, something is wedged. Use tongs, never fingers, to pull out a bone, bottle cap or spoon. If it is silent, wait ten minutes for the overload to cool, press reset again and check the outlet and breaker.
Read the manual, because a few models differ. A unit that leaks from the bottom, trips the breaker again and again or has a cracked housing is finished, and replacement is the answer. For that, see garbage disposal repair.
Which signs mean I should hire a plumber instead?
Phone a plumber if the stop refuses to close, the handle is frozen on, parts are not available, water is seeping behind a wall, or the drip returns inside a week. A faucet is a fine thing to learn on. A buried valve or a crumbling stem set in plaster is not.
Leave cutting and soldering supply pipe to a contractor. A contractor license is mandatory in California for permitted work at any price, and for any job where labor and materials hit $1,000. A faucet swap rarely reaches either mark, but relocating lines, changing the main valve or touching a gas line does.
Water pooling near an outlet is a shock hazard. Do not go near that outlet. Close the main valve and ring a plumber.
Common questions
The drip continues even with new rubber. Why?
Check the seat for pitting. New rubber has nothing to seal against on rough metal. A seat wrench pulls it out, or a resurfacing tool can smooth it. A washer in the wrong size drips as well, so match diameter and bevel to the old one right there in the aisle.
How much time should I allow?
Plan an hour for a sink faucet if it is your first, and longer for a tub with hidden valves. Seized parts add time. A plumber at the house usually finishes a plain faucet faster, though the arrival slot depends on the day.
Is a minor drip really worth my time?
Yes, because the loss never stops. A small drip adds up over months, and a hot one wastes heating energy too. A washer or cartridge costs little by comparison, and constant moisture can stain the basin and swell the cabinet floor below.
What if turning the handle does not stop the water?
Turn the stops beneath the sink. When those fail, close the whole-house main, drain the lines by opening the lowest faucet in the house, then phone a plumber. Stop wrenching on the handle, because a twisted stem can leave a leak that no longer closes.
References
- EPA WaterSense, Fix a Leak Week
- San Bernardino Municipal Water Department, 2024 Consumer Confidence Report
- East Valley Water District, 2025 water quality report
- City of Redlands, 2026 water quality report
- Yucaipa Valley Water District, annual water quality report
- Bob Vila, kitchen faucet installation cost, checked 2026-11-17
- This Old House, plumber cost, checked 2026-11-17